Trust & transparency
Evidence & disclosures
Evidence basis: Hands-on test. Colin personally used the product, process, aircraft, software, or location described.
Documents my actual dictation-to-CMS workflow, repository code, and Google/OpenAI guidance; it describes one evolving system, not a universal publishing formula.
Sources checked: Aug 20, 2026
Linked references: 13 explicit sources in the article.
How I Built My Auto Blog Workflow: From Dictation to Draft
TLDR
- Most of my posts now begin with me talking through a rough idea in ChatGPT, not staring at an empty document and pretending inspiration has office hours.
- The spoken notes are source material, not the finished article. A people-first workshop forces me to identify my evidence, the reader, the practical outcome, and what I can add beyond a generic AI answer.
- Reusable skills then turn the approved idea into a draft package, native Editor.js blocks, SEO metadata, and exact image requirements.
- Every package stays a draft. JSON validation, image checks, source review, and a final CMS preview happen before publishing.
- I am sharing the public CMS code and sanitized examples here. Tokens, private network details, local file paths, raw personal notes, and environment files stay private.
Most of my blog posts begin with me talking to ChatGPT like I am leaving a voicemail for a very patient coworker.
The first pass is not polished. It may include half a title, three examples, a side story I am not sure belongs, and a sentence that made perfect sense while I was walking around the house. That is the point. Dictation gets the idea out before the internal editor can stand in the doorway and ask for a completed outline.
ChatGPT Dictation turns a recording into editable text before it is sent, which is useful because transcripts are not perfect and neither are my first thoughts. I can correct a name, remove something private, and make sure “Editor.js” did not become “editorial jazz” before the real work begins. The official Voice Dictation FAQ explains that basic record, transcribe, review, and send loop.
What happens after the dictation is the part I have been building.
This is my current Auto Blog workflow: capture the idea, question it, shape it, package it, create the visual assets, run the SEO checks, and then hand a reviewed draft to the ColinMichaels.com CMS. It is not an automatic publishing machine. It is a local production line with several places where a human can—and should—say, “Nope, that is not what I meant.”
The Whole Process in One Picture
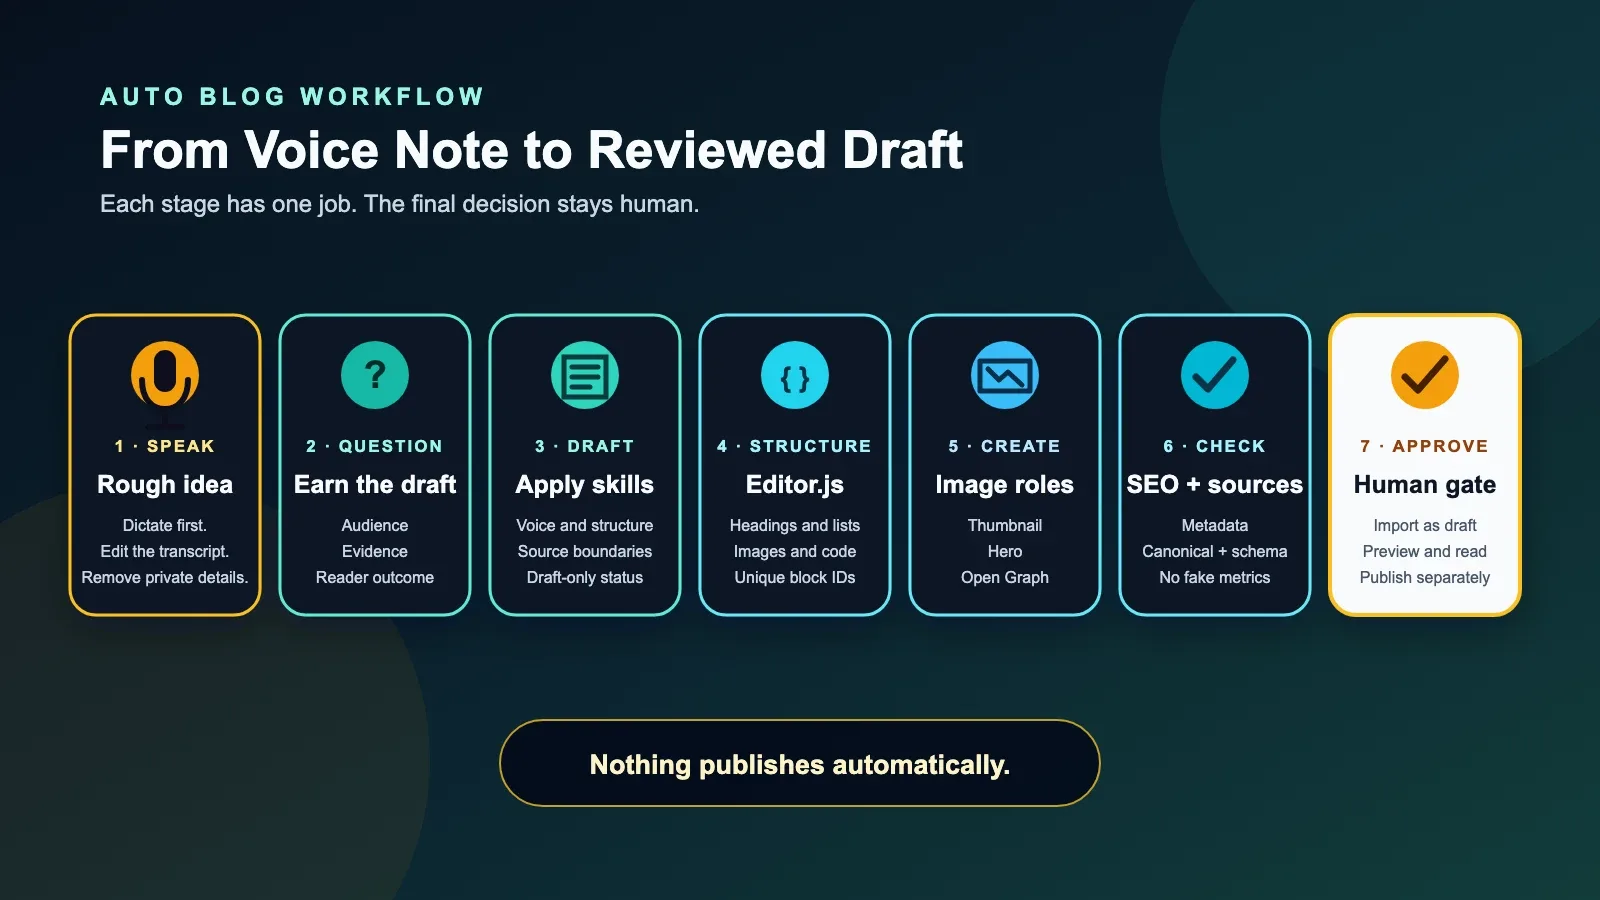
The simplified flow is:
- Dictate the messy idea in ChatGPT.
- Review the transcript and preserve the real details.
- Complete a people-first brief before generating prose.
- Use a blog-post skill to build the draft and CMS contract.
- Convert the article into native Editor.js blocks.
- Generate and validate the thumbnail, hero, and social image.
- Run content, metadata, and technical SEO checks.
- Import the package as a draft and review it like a reader.
Each stage has a job. When one stage tries to do all the jobs, the workflow gets fast but unreliable.
Step 1: Dictate the Mess, but Give It a Job
I do not begin by saying, “Write me a 2,000-word article about automation.” That prompt skips the part where I decide whether I have anything useful to say.
I begin by asking ChatGPT to listen, organize, and challenge the notes without drafting the article yet.
I am going to dictate rough notes for a possible blog post.

Do not write the article yet.

After I finish, return:
1. The main idea in one sentence.
2. The exact reader and the situation they are in.
3. The first-hand examples, builds, tests, or opinions I supplied.
4. Any names, dates, claims, or technical details that need verification.
5. What this could add beyond a generic AI answer.
6. Three questions I should answer before we draft.

Preserve my uncertainty. Do not invent missing facts.
Flag anything that may be private before repeating it in a public draft.
That prompt turns dictation into a source review instead of a content vending machine.
It also creates the first security checkpoint. I can remove a token I accidentally read aloud, replace a private address with a general description, or decide that a family detail belongs in my notes but not on the public internet.
Step 2: Make the Idea Earn a Draft
The earlier version of Auto Blog Studio could take notes and generate a decent structure. The newer version pauses first for six questions:
- Why should this post exist?
- What original value can I add?
- What first-hand evidence or honest uncertainty anchors it?
- What should the reader be able to do afterward?
- What visual would teach the idea faster than another paragraph?
- What can the reader score, choose, compare, test, or change?
This is the people-first layer of the system.
Google's guidance on helpful, reliable, people-first content asks whether a page demonstrates first-hand expertise, provides original value, serves an intended audience, and leaves the reader feeling they learned enough to reach a goal. Those are much better starting questions than “How many keywords can I fit into the introduction?”
For this post, the evidence is the workflow itself: the local application, the reusable skills, the public CMS code, the generated JSON package, the images, and the validation results. The practical outcome is that a reader should be able to sketch a smaller version of the same system without needing my exact setup.
Step 3: Use Skills as Repeatable Production Rules
I use the word “skill” for a reusable instruction package that tells the AI what good work looks like for a specific job.
One skill handles the ColinMichaels.com article package. It defines the voice, post types, metadata, draft status, CMS fields, image paths, and validation checklist. Another skill handles the image contract. It audits what exists, plans what is missing, generates the required roles, updates CMS paths, and checks the final dimensions.
The important part is not the label. A skill is basically a well-maintained recipe card with guardrails.
Here is a safe starter version of the article-package contract:
{
  "author": {
    "name": "Your Name",
    "title": "Your Role"
  },
  "status": "draft",
  "contentFormat": "editorjs",
  "publishedAt": null,
  "required": [
    "title",
    "slug",
    "excerpt",
    "categories",
    "tags",
    "seo",
    "blocks"
  ]
}
Notice the default status. Draft is not an accident. The automation is allowed to prepare. It is not allowed to quietly decide that the internet needs my unreviewed Tuesday-afternoon monologue.
Step 4: Turn the Article Into Editor.js Blocks
Markdown is convenient for writing, but the site CMS stores structured Editor.js blocks. A paragraph is a block. A heading is a block. Lists, quotes, images, embeds, charts, and code are blocks too.
The import package uses a stable outer envelope:
{
  "version": 1,
  "source": "colinmichaels-cms",
  "collection": "posts",
  "totalPosts": 1,
  "posts": [
    {
      "slug": "example-post",
      "status": "draft",
      "contentFormat": "editorjs",
      "blocks": []
    }
  ]
}
The code examples in this article are native code blocks, not paragraphs wearing a dark background as a disguise. A code block looks like this inside the import:
{
  "id": "starter-prompt",
  "type": "code",
  "data": {
    "language": "text",
    "code": "Keep the prompt text here exactly as the reader should copy it."
  }
}
The public ColinMichaels.com repository shows the whole path:
- The CMS code-block tool edits and validates the block.
- The Markdown importer turns fenced code into a native block.
- The Editor.js adapter preserves the code and language fields.
- The public blog renderer displays the formatted block with a copy button.
That is why I like structured content. The writing and the rendering agree on what each piece is supposed to be.
Step 5: Build the Images as Part of the Package
Images used to be the step I would leave for later, which is a polite way of saying I would forget them until the post was otherwise ready.
The workflow now treats them as required deliverables:
- A 1600 × 900 WebP thumbnail for cards and listings.
- A 1920 × 1080 WebP hero for the article page.
- A 1200 × 630 JPEG Open Graph image for social previews.
- An inline diagram or screenshot when it actually teaches something.
The thumbnail process starts with the honest promise of the article, chooses one visual hook, generates the background art, adds exact title text deterministically, and checks whether the result still works at phone size. The image-packaging step then creates each exact role, updates the JSON paths, checks the dimensions, and audits the folder.
The key word is “role.” One random 1,024-pixel square is not automatically a thumbnail, hero, and social card just because I am feeling optimistic.
Step 6: Use SEO as a Review System, Not a Word Sprinkler
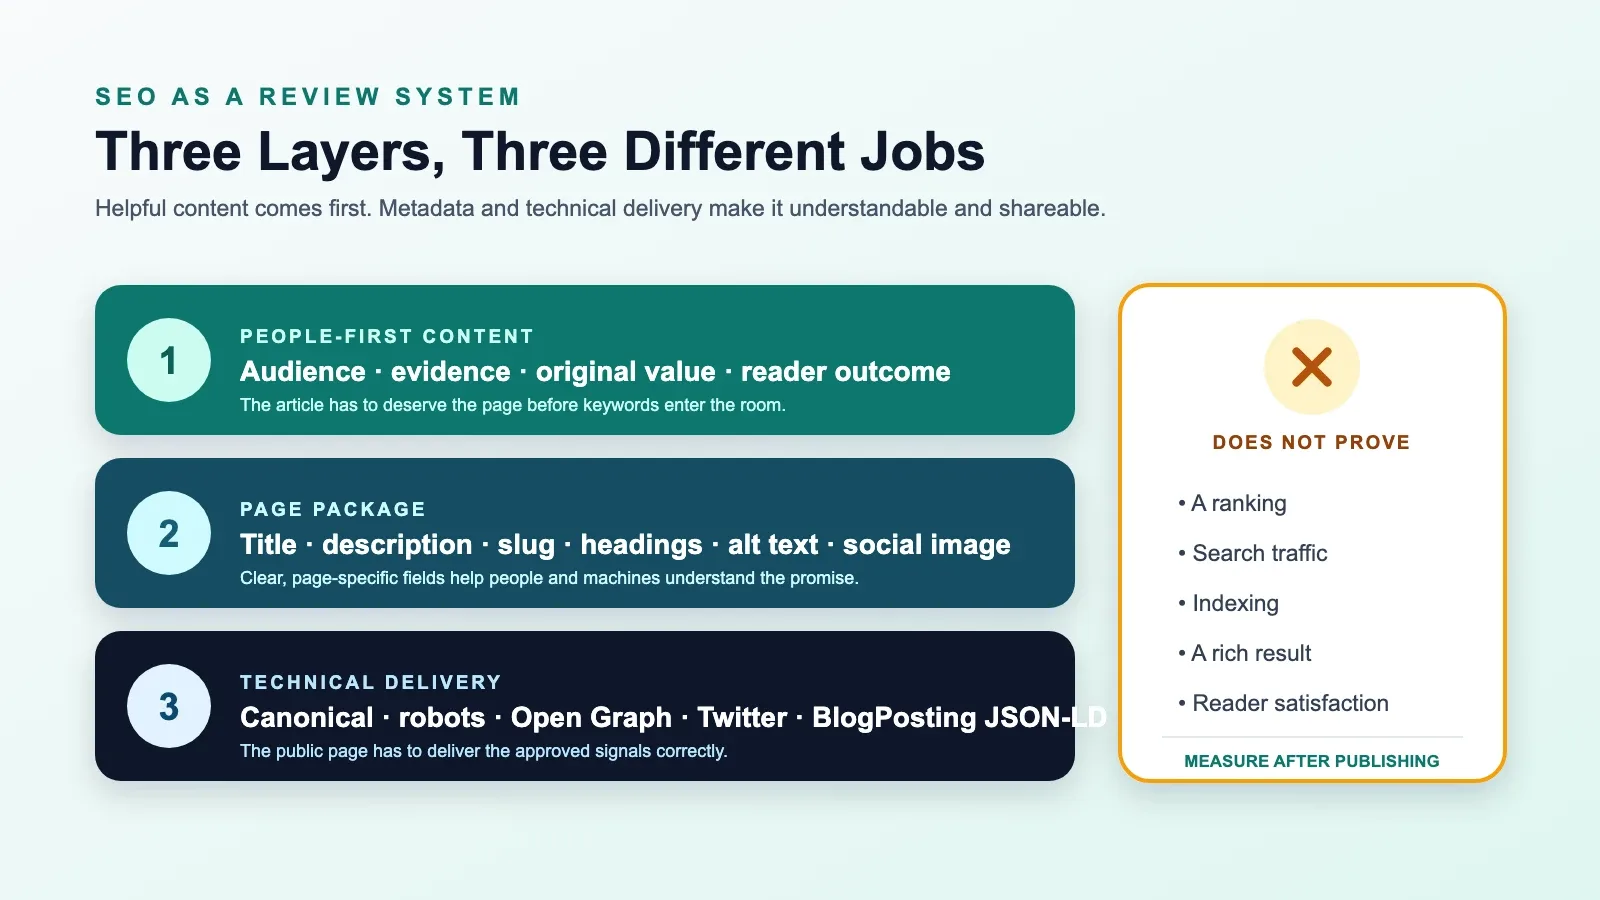
The SEO work in this process has three layers.
Layer 1: The article has to deserve the page
The people-first brief checks the audience, original value, evidence, reader outcome, and usefulness before metadata enters the room.
This is the most important SEO optimization in the workflow because it helps prevent a technically tidy page with nothing new to offer.
Layer 2: The package needs clear metadata
The local SEO Lab reviews:
- The main title and SEO title.
- The excerpt and page-specific meta description.
- The focus topic and likely reader intent.
- The stable lowercase slug.
- Categories and reusable tags.
- Heading structure.
- Inline image alternative text.
- The cover image and dedicated social image.
- The canonical URL.
- Optional source-aware comparisons and content gaps.
The CMS uses 30–60 characters for the SEO title and 120–160 characters for the description as internal warning bands. They are editing targets, not Google commandments. Google says title links are generated automatically from several page signals, and descriptive, concise title text is the useful goal. Google also says there is no fixed meta-description limit; snippets are truncated to fit and are often created from the page itself. A unique, accurate description simply gives Search another good option, as the snippet guidance explains.
The public CMS SEO checklist makes these review items visible instead of hiding them in a publishing document nobody opens.
The optional research pass can compare source-backed result angles, reader questions, and gaps. It is specifically told not to invent keyword volume, ranking difficulty, traffic, or current search positions. If real performance data is not connected, the honest output is an editorial recommendation—not “this keyword will definitely rank.”
Layer 3: The site has to deliver the signals correctly
When a public article loads, the site applies the title, description, canonical URL, robot instructions, Open Graph fields, Twitter card fields, and article metadata. It also creates BlogPosting JSON-LD with the headline, description, URL, image, dates, author, and main page entity.
You can see that in the public SEO service and the blog metadata service.
Structured data helps search engines understand a page. It does not reserve a fancy result. Google's article structured-data documentation recommends validation and live URL inspection, and its general guidelines make clear that correct markup does not guarantee a rich result.
That distinction matters throughout this project: ready is not the same as ranked, and validated is not the same as discovered.
Step 7: Import, Preview, and Keep the Human Gate
The final package includes the article, the Editor.js import, the image assets, metadata, source notes, and review evidence.
Before I call it ready, I check:
- The JSON parses.
- The package contains exactly one post.
- Every Editor.js block has a unique ID.
- The status is still draft and publishedAt is still null.
- Every referenced image exists at the expected local filename.
- Thumbnail, hero, and Open Graph dimensions match their contracts.
- The original CMS import keeps code examples as native code blocks and diagrams as image blocks.
- Links are public and intentional.
- Auto Blog Studio accepts the package for preview and can export a valid one-post draft envelope.
- The visual preview is readable at full size and at small card sizes.
There is one honest limitation in the current preview path: Auto Blog Studio converts imported blocks to Markdown for editing, and that adapter is not yet a lossless round trip for custom image and code blocks. I keep the validated original CMS JSON as the source of truth and do not replace it with the preview export. That is a real boundary—and a useful next test to automate.
Then I read the article again.
Automation is excellent at confirming that a file is valid. It cannot tell me whether I sound like myself, whether a joke is worth keeping, or whether I have shared more than I intended.
Is It Safe to Share This Code?
Yes—with a boundary.
The content model, public renderer, validation ideas, prompt patterns, and sanitized examples are safe and useful to share. They show how the pieces fit together without granting access to anything.
I am intentionally not publishing:
- .env files or the value of any token, secret, or API key.
- Private network addresses or internal gateway locations.
- Absolute local file paths and machine-specific usernames.
- Raw dictated notes that contain personal or unpublished information.
- Authentication headers with real values.
- Private admin data, account IDs, or deployment credentials.
Public code is not the same thing as public credentials.
If I later publish the Auto Blog Studio orchestration layer itself, it should include an example environment file containing blank placeholders, server-side secret handling, path-traversal protection, redacted diagnostics, documented trust boundaries, and tests for every endpoint that reads or writes files.
A Starter Prompt for Building Your Own Version
You do not need my entire site to build the first useful version. Start with a local tool that accepts notes and produces a reviewable folder.
Help me build a local-first blog production tool.

Goal:
Turn my rough notes or voice transcript into a reviewed draft package.

Inputs:
- Working title
- Raw notes or transcript
- Audience
- Content type
- Target length
- Source links
- People-first brief: purpose, original value, evidence, reader outcome

Outputs:
- Markdown draft
- One-post Editor.js JSON import
- SEO title, description, slug, categories, and tags
- Image directions and final asset paths
- Source notes
- Review checklist

Safety rules:
- Default every post to draft.
- Never publish automatically.
- Keep secrets server-side and out of logs.
- Reject paths outside the allowed workspace.
- Use placeholders in examples.
- Preserve source notes and flag unsupported claims.

Validation:
- Parse the JSON.
- Require unique block IDs.
- Check all referenced image files.
- Verify canonical and social metadata.
- Show a final human approval screen.

First, propose the smallest architecture and file contract.
Then build one vertical slice from notes to saved package.
That prompt asks for a real product boundary before it asks for a giant feature list.
A Starter Prompt for the SEO Pass
Act as a people-first SEO editor for this one draft.

Return:
- One recommended page title and four alternatives
- A stable lowercase slug
- One page-specific meta description
- The likely reader intent
- Primary and secondary topic language
- Questions the article should answer
- Missing evidence or content gaps
- Suggested internal links
- Image alt-text suggestions
- Any claim that needs a source

Rules:
- Keep the title descriptive and honest.
- Do not stuff keywords.
- Do not claim search volume, ranking difficulty, traffic, or SERP position unless measured data is supplied.
- Treat title and description lengths as editorial checks, not ranking rules.
- Prefer first-hand usefulness over generic coverage.
- Explain why each recommendation fits the actual draft.
The Smallest Version Worth Building
If I were starting again, I would build these pieces in order:
- A notes box and local Save button.
- A people-first questionnaire.
- A draft generator that returns strict structured data.
- A stable Editor.js export contract.
- A preview that can import its own export.
- A metadata and link checklist.
- Exact image roles and filenames.
- A final approval gate.
I would not begin with automatic publishing, a social scheduler, twelve AI providers, or a dashboard showing numbers I had not measured.
The first useful win is much simpler: one honest idea goes in, one complete draft package comes out, and nothing becomes public by surprise.
Final Thought
The part I like most about this process is that it starts with talking and ends with structure.
The original idea can still be messy, personal, and unfinished. The workflow does not demand that I sound like a CMS before I am allowed to think. It captures the rough version, asks better questions, applies repeatable standards, and gradually turns the idea into something the site can understand.
AI helps at almost every stage, but it does not get the final vote.
That may be the most important feature I built.
Sources and Code
- Voice Dictation FAQ — OpenAI Help Center (accessed August 3, 2026)
- Creating helpful, reliable, people-first content — Google Search Central (accessed August 3, 2026)
- Influencing title links — Google Search Central (accessed August 3, 2026)
- Control your snippets in search results — Google Search Central (accessed August 3, 2026)
- Article structured data — Google Search Central (accessed August 3, 2026)
- ColinMichaels-Angular public repository (public repository and linked source snapshot verified August 3, 2026)
What is your experience with writing blog posts and CMS?
Would like to see how many people reading this have experience with CMS systems like wordpress for writing posts.
- Wordpress Expert
- New to blogs
- Just Looking
- Did some stuff back in the day.